Illustrator基础教程:制作简单的无缝贴图(3)
文章来源于 腾龙设计,感谢作者 佚名 给我们带来经精彩的文章!设计教程/矢量教程/Illustrator教程2011-06-15
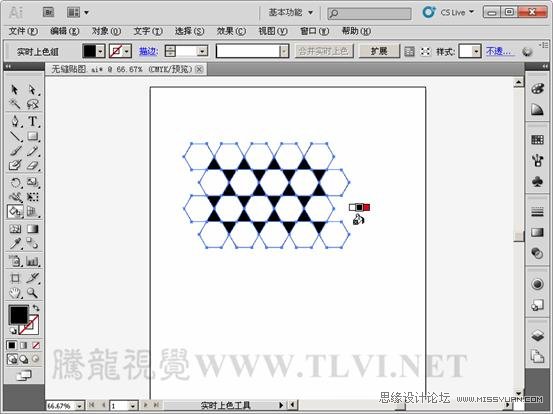
(9)设置填充色为黑色,选择时实上色工具。 (10)为图形填充颜色。 (11)使用矩形选框工具,绘制矩形形状。 (12)执行对象排列置于底层命令,将矩形形状置于最底层。
 情非得已
情非得已
推荐文章
-
 Illustrator绘制扁平化风格的建筑图2020-03-19
-
 Illustrator制作扁平化风格的电视机2020-03-18
-
 Illustrator绘制渐变风格的建筑场景插画2020-03-12
-
 佩奇插画:用AI绘制卡通风格的小猪佩奇2019-02-26
-
 插画设计:AI绘制复古风格的宇航员海报2019-01-24
-
 房屋插画:AI绘制圣诞节主题的房屋插画2019-01-21
-
 圣诞插画:AI绘制简约风格圣诞节插画2019-01-21
-
 灯塔绘制:AI绘制的灯塔插画2019-01-21
-
 时尚船锚:AI绘制鲜花装饰的船锚图标2019-01-18
-
 扁平宝箱图形:AI绘制游戏中常见的宝箱2019-01-18
热门文章
-
 Illustrator制作复古风格的邮票效果2021-03-10
-
Illustrator制作复古风格的邮票效果
相关文章2112021-03-10
-
Illustrator制作扁平化风格的电视机
相关文章5132020-03-18
-
 Illustrator制作卡通风格的法国建筑图
相关文章6122020-03-18
Illustrator制作卡通风格的法国建筑图
相关文章6122020-03-18
-
 文字设计:用AI制作趣味剪影文字效果
相关文章12412019-08-15
文字设计:用AI制作趣味剪影文字效果
相关文章12412019-08-15
-
 霓虹文字:用AI制作立体灯管艺术字
相关文章17302019-08-15
霓虹文字:用AI制作立体灯管艺术字
相关文章17302019-08-15
-
 标志设计:用AI制作2.5D风格的LOGO图标
相关文章26042019-04-16
标志设计:用AI制作2.5D风格的LOGO图标
相关文章26042019-04-16
-
 AI结合AE制作字体动画艺术效果
相关文章7232019-04-08
AI结合AE制作字体动画艺术效果
相关文章7232019-04-08
-
 饼图工具:用AI制作立体图形教程
相关文章17832019-03-26
饼图工具:用AI制作立体图形教程
相关文章17832019-03-26
