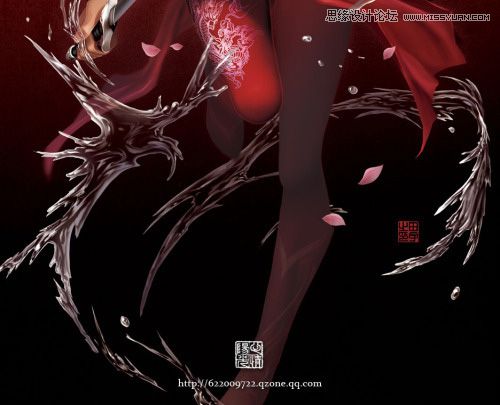
Photoshop绘制围绕美女的飞溅水花(2)
文章来源于 未知,感谢作者 秩名 给我们带来经精彩的文章!设计教程/PS教程/鼠绘教程2010-02-02
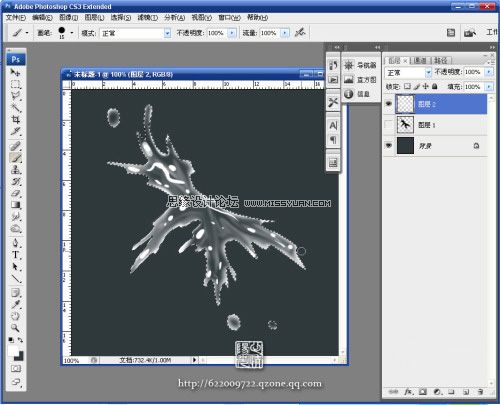
6:用小笔刷在选区范围内按水花走势画一些曲线,力求自然随意。 7:用手指工具涂抹,使得线条自然有流动感。 8:再用硬笔头画高光部分 9:重复用手指工具涂抹,把高光形状休整自然 10:为了让水更真实有层次,上面


 情非得已
情非得已
推荐文章
-
 Photoshop绘制磨砂风格的插画作品2021-03-16
-
 Photoshop结合AI制作扁平化滑轮少女插画2021-03-11
-
 Photoshop结合AI绘制扁平化风格的少女插画2020-03-13
-
 Photoshop结合AI绘制春字主题插画作品2020-03-13
-
 Photoshop绘制时尚大气的手机APP图标2020-03-12
-
 Photoshop绘制立体感十足的手机图标2020-03-12
-
 玻璃瓶绘画:PS绘制玻璃质感的魔法瓶2020-03-11
-
 像素工厂:用PS设计等距像素的工厂图标2019-03-20
-
 圣诞老人:使用PS绘制圣诞老人插画2019-02-21
-
 Lumix相机:PS绘制粉色的照相机教程2019-01-18
热门文章
-
Photoshop结合AI制作扁平化滑轮少女插画2021-03-11
-
Photoshop绘制磨砂风格的插画作品2021-03-16
-
 Photoshop绘制长发飘飘的美女人像
相关文章10112018-11-30
Photoshop绘制长发飘飘的美女人像
相关文章10112018-11-30
-
 Photoshop鼠绘时尚逼真的美女头像
相关文章4802018-03-19
Photoshop鼠绘时尚逼真的美女头像
相关文章4802018-03-19
-
 Photoshop鼠绘可爱的CG美女人物教程
相关文章4872018-03-15
Photoshop鼠绘可爱的CG美女人物教程
相关文章4872018-03-15
-
 Photoshop绘制可爱风格的美女Q版头像
相关文章7432017-05-22
Photoshop绘制可爱风格的美女Q版头像
相关文章7432017-05-22
-
 Photoshop绘制古装美女以死相逼的场景效果
相关文章16102016-01-30
Photoshop绘制古装美女以死相逼的场景效果
相关文章16102016-01-30
-
 Photoshop结合SAI给荷叶下美女转手绘
相关文章11742015-03-17
Photoshop结合SAI给荷叶下美女转手绘
相关文章11742015-03-17
-
 Photoshop结合SAI给生活照美女转手绘教程
相关文章15072015-03-17
Photoshop结合SAI给生活照美女转手绘教程
相关文章15072015-03-17
-
 Photoshop结合SAI制作唯美的美女转手绘效果
相关文章13692015-03-17
Photoshop结合SAI制作唯美的美女转手绘效果
相关文章13692015-03-17
