Photoshop CS5教程:解析色阶在图像调整中的作用
文章来源于 腾龙设计,感谢作者 佚名 给我们带来经精彩的文章!设计教程/PS教程/其他教程2011-04-20
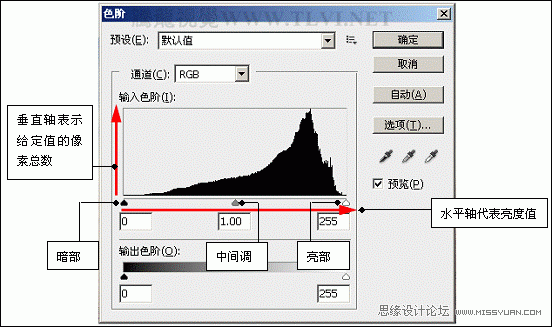
本教程主要使用Photoshop通过实例解析色阶在图像调整中的作用,使用“色阶”调整命令,可以通过调整图像的暗调、中间调和高光的亮度级别来校正图像的影调,包括反差、明暗和图像层次,以及平衡图像的色彩。
 情非得已
情非得已
推荐文章
-
 Photoshop详解商业磨皮中如何提升照片质感2020-03-19
-
 直方图原理:实例解析PS直方图的应用2019-01-17
-
 工具原理:详解PS渐变映射的使用技巧2019-01-10
-
 Photoshop CC 2019 20.0中文版新功能介绍2018-10-24
-
 Photoshop详解ACR渐变滤镜在后期的妙用2018-09-29
-
 Photoshop通过调色实例解析直方图使用技巧2018-09-29
-
 Photoshop详细解析CameraRaw插件使用2018-03-29
-
 Photoshop解析新手必须知道的学习笔记2017-06-05
-
 Photoshop详细解析曲线工具的使用原理2017-02-08
-
 Photoshop详细解析钢笔工具的高级使用技巧2016-12-08
热门文章
-
 Photoshop巧用内容识别工具给人物进行缩放
相关文章5752020-03-04
-
 调色技巧:详细解析调色工具原理与使用
相关文章4482019-07-17
-
 儿童调色:用PS详解儿童人像的后期技巧
相关文章10062019-07-10
-
 曲线工具:详解PS曲线和灰度蒙版的技巧
相关文章11762019-03-06
-
 直方图原理:实例解析PS直方图的应用
相关文章7402019-01-17
-
 工具技巧:巧用PS白平衡调整出创意色调
相关文章7002019-01-16
-
 Photoshop详细解析HSL调色工具的使用技巧
相关文章7382018-12-11
-
 Photoshop详细解析曲线和色阶的异同之处
相关文章4892018-11-18


